Saturday, 5 November 2016

View Threshold limit issue in List/Library

Today I am providing the Power Shell Script that will disable view threshold limit on a given library of the given site. This script is useful in case your list/library has more document then its view threshold limit and you are not able to see any data in the list and even no view is working as indexing can’t be done after view threshold limit is crossed. Use this script on the list then you will be able to index the columns. This option will be applied on the given list only so you will not need to change view threshold  limit to see the items in the list.

Inputs
Site url - URL of the site where your list/library exists
List name - name of the list/library where you want to disable threshol limit

Outputs
This script will disable view threshold limit on a given library of the given site.

Example-
.\scriptname.ps1
.\scriptname.ps1 | out-file “FilePath\Filename.txt”

Dependencies –
For executing this script user must be added in site collection administrators in the sites.
User should have Shell Admin rights to run the scripts.
Run Management Shell as an Administrator.
How to execute -
Copy this script and paste in Note pad.
Save this file as .ps1.
Run this script in SharePoint Management Shell. You can run this script in PowerShell as well.
Follow on screen instructions.
FOR ANY HELP ON THIS SCRIPT USE "GET-HELP .\SCRIPTNAME.PS1 --FULL" AFTER SAVING THIS FILE.


Go to above link to get the script.

Enable Developer Dashboard

Today I am providing the Power Shell Script that will enable Developer Dashboard in your SharePoint 2013 environment.

Inputs
Database name - Database name required if we need to create a new usage application
Usage application name - Usage application name required if we need to create a new usage application

Outputs
This Script will enable Developer Dashboard in local SharePoint 2013 environment.

Example-
.\scriptname.ps1
.\scriptname.ps1 | out-file “FilePath\Filename.txt”

Dependencies –
For executing this script user must be added in site collection administrators in the sites.
User should have Shell Admin rights to run the scripts.
Run Management Shell as an Administrator.
How to execute -
Copy this script and paste in Note pad.
Save this file as .ps1.
Run this script in SharePoint Management Shell. You can run this script in PowerShell as well.
Follow on screen instructions.
FOR ANY HELP ON THIS SCRIPT USE "GET-HELP .\SCRIPTNAME.PS1 --FULL" AFTER SAVING THIS FILE.
Go to above link to get the script.


Reset BLOB Cache

Today I am providing the Power Shell Script that will reset the BLOB Cache of the wfe server. 
Sometimes BLOB cache stop syncing with database due to this reason you will not able to recognize the changes (if any Change is made) in the file that are enabled for blob cache. In that case we have to flush the BLOB Cache. This script is needed to be run on all the wfe servers where ever the web application hosting.
Inputs
Web Application URL - URL of the web application for which you are going to reset the blob cache

Outputs
This script will reset the BLOB cache of the given web application.

Example-
.\scriptname.ps1
.\scriptname.ps1 | out-file “FilePath\Filename.txt”

Dependencies –
For executing this script, User who is going to flush the BLOB cache must have securityadmin and dbowner rights on SQL and database.
User should also be local administrator on the server where this script will be executed.
User should have Shell Admin rights to run the scripts.
Run Management Shell as an Administrator.

How to execute -
Copy this script and paste in Note pad.
Save this file as .ps1.
Run this script in SharePoint Management Shell. You can run this script in PowerShell as well.
Follow on screen instructions.
FOR ANY HELP ON THIS SCRIPT USE "GET-HELP .\SCRIPTNAME.PS1 --FULL" AFTER SAVING THIS FILE.


Go to above link to get the script.

Properly Install/Uninstall/Update Sharepoint Solution


Today I am providing the Power Shell Script that will install, uninstall or update a SharePoint solution (wsp file) in SharePoint. It will also activate/deactivate the site collection, Web app feature in SharePoint web application/Site collection.

Inputs
Path - Provide log file path to save the logs of the script.
Action - Select option to be performed - 1 for update, 2 for Install or 3 for Uninstall
webapplication url - provide web application url for installing the wsp file and activating the feature.

Outputs
Solution will be installed, uninstalled and updated on the bases of selected option.if you are selecting uninstall or update solution a backup of existing wsp will be taken from SharePoint in log file path.

Example-
.\scriptname.ps1
.\scriptname.ps1 | out-file “FilePath\Filename.txt”

Dependencies –
Solution and script should be saved in same folder. it will install/uninstall all the solutions.
For activating/deactivating a feature, feature name should contain the name of wsp file in its name.
For executing this script user must be added in site collection administrators in the sites.
User should have Shell Admin rights to run the scripts.
Run Management Shell as an Administrator. 
How to execute -
Copy this script and paste in Note pad.
Save this file as .ps1.
Run this script in SharePoint Management Shell. You can run this script in PowerShell as well.
Follow on screen instructions.

FOR ANY HELP ON THIS SCRIPT USE "GET-HELP .\SCRIPTNAME.PS1 --FULL" AFTER SAVING THIS FILE.


Go to above link to get the script.

Find a given webpart in the given site collection


Today I am providing the Power Shell Script that is useful to find out a given web part (or all) in all the pages in all over the given site collection.

Inputs
Path - Provide log file path to save the web part report.
Sitecollection url - provide site collection url where the given web part will be searched.
Webpart name - Enter the webpart name, Name is case sensitive (Use wild card (*) if you want to match a particular string in name like you can use *bp* to get the list of all page that contains any webpart which contains bp in its name or provide * to get the list of all webparts

Outputs
A CSV file will be generated with the url of the pages where a given web part is available. or all the web parts available.

Example-
.\scriptname.ps1
.\scriptname.ps1 | out-file “FilePath\Filename.txt”

Dependencies –
For executing this script user must be added in site collection administrators in the sites.
User should have Shell Admin rights to run the scripts.
Run Management Shell as an Administrator. 
How to execute -
Copy this script and paste in Note pad.
Save this file as .ps1.
Run this script in SharePoint Management Shell. You can run this script in PowerShell as well.
Follow on screen instructions.

FOR ANY HELP ON THIS SCRIPT USE "GET-HELP .\SCRIPTNAME.PS1 --FULL" AFTER SAVING THIS FILE.


Mapping User Profile Property for AD Synchronization

Today I am providing the Power Shell Script that will map the given user profile properties with given AD Synchronization properties. User will have to create a CSV file that will contain User Profile Property names and their respective Connection and Ad property and script will map them all.

Inputs
CSV path - Provide the Path of CSV file where you have save to map the user profile.

Outputs
This script will map user profile properties for Ad synchronization properties, that you have defined in CSV file. Define the mapping multiple times if you want to add mapping multiple times.

Example-
.\scriptname.ps1
.\scriptname.ps1 | out-file “FilePath\Filename.txt”

Dependencies –
Run this script with Farm Account. Farm account is the user who installed SharePoint.
User should have Shell Admin rights to run the scripts.
Run Management Shell as an Administrator. 
How to execute -
Copy this script and paste in Note pad.
Save this file as .ps1.
Run this script in SharePoint Management Shell. You can run this script in PowerShell as well.
Follow on screen instructions.

FOR ANY HELP ON THIS SCRIPT USE "GET-HELP .\SCRIPTNAME.PS1 --FULL" AFTER SAVING THIS FILE.
CSV file template –

Sunday, 8 May 2016

Using Task Scheduler to automate PowerShell Scripts

Today I am Providing the way to run PowerShell scripts using Windows Scheduler.

Windows Task Scheduler allows you to schedule PowerShell scripts to accomplish a wide variety of commands on the scheduled time that best fits your needs.


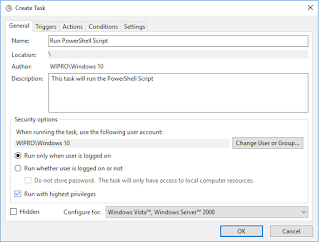
1.    Open Task Scheduler and create a new task. Give it a Name and set your security options as per your requiredments.  Check "Run with highest privileges" as our most scripts need to run as admin.  If you want this script to run without logging in to system, enable the 'Run whether user is logged on or not' radio button.


2.    Click on the Triggers tab and set your schedule or event that will trigger the running of your PowerShell script.        


3.    Click on the Actions tab and click on New.

Action: Start a program

Program/script: Powershell.exe

You don't need to put a path as it should already be on your system.

4.    First you need to set the ExecutionPolicy. You have two options here, you can set the ExecutionPolicy on the machine or you can do it on a per-script basis.

To set the execution policy globally, you can issue this command from within PowerShell:

Set-ExecutionPolicy Unrestricted

      However, here we want to set the execution policy on a per script basis and open up security for us to run the script. This security policy will only be in effect for the script we are running and not compromise security otherwise.

That means we use the following Argument:

-ExecutionPolicy Bypass -File “Your Script Path”


Now Action Windows Should look like this.
                 
5.  You can provide conditions and Settings if you need or any requirement.
6. Save and Test

Now you script will run on you selected time or on given interval.